Turtle Shell Repair
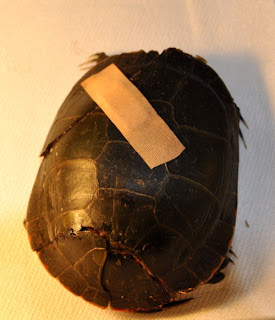
 A male painted turtle came into the facility with major factures on its carapace and bridge. The person that found the turtle had placed a bandage on the largest fracture to keep the pieces together. The front left marginal and coastal scutes had a fracture going through it and at the rear there were two fractures that covered the marginal and coastal scutes.
The area was assessed and flushed with saline solution to ensure that the wound was clean. There were some concerns about the length of time the turtle had been in this state. The turtle was found on August 23 and the facility didn't get the call until the 28th. Arrangements were made to travel the 256 km round trip within 36 hours.

The first process was to secure the fragments at the rear of the carapace. Holes were drilled on the marginal scutes, on the damaged section and on the healthy section to string stainless steel wire through. While drilling the holes, a stainless steel large spoon was use as a barrier to protect soft tissue from the drill bit. The wire was threaded through the holes and twisted, securing the fractured pieces together. The two fractured pieces were then drilled and a wire was threaded through the two fracured pieces and then twisted together to secure fracture. Two braces were fashioned and held into place with epoxy resine. Care was taken to ensure that the resin did not seep into the wounds. The ensured that both upper and lower portion of the fracture were securely held into placed.

The next phase was securing the long fracture on the left side. Again holes were drilled on the marginal scutes above the head and the stainless steel wire was used to stablize the area. As shown in the picture, the wire in the underside of the marginal scute is pressed toward the shell so that the turtle does not rub its head on it. All wire hardware was adjust as such to avoid soft tissue abraision.

The bridge of of the turtle was also damaged. Literature states that this area is difficult to mend. any movement of the turtle can disturb the bridge making healing difficult. To assist as best we could, we fashioned a "C" shape brace to hold the pieces in place. Again the brace was held in place using fast drying epoxy resin. It is our hope that by minimizing the movement it will allow it to knit. Otherwise the lack of a secure bridge would make this turtle quite vunerable.

Once the bridge brace was secured, the wounds were irrigated a final time using saline solution. Using a bag of saline solution a hypodermic need was inserted into the bag and then the solution squeezed out. This gave a fine jetstream of saline solutin which was useful in targetting small areas.

The final stage was adding Flamazine to the fracture sites. This aids in the healing process and helps protect against infection. Regardless the turtle was weighed and Baytril antibiotics was given to help fight off infection. Medicam was also injected to ease the discomfort.
The turtle was then placed in 'dry dock' to allow healing. The turtle was placed in a centermeter of water a couple times daily to allow it to drink but now allow the water to reach the wounds. This allowed the turtle to stay hydrated.
The turtle was then closely monitored for the next several days.
Labels: Turtle Shell Repair


0 Comments:
Post a Comment
Subscribe to Post Comments [Atom]
<< Home